I love my camera and taking pictures. It is a learning process and as a result I delete many more pictures than I keep. Thank goodness for digital cameras!
What I haven't liked is the camera strap that came with my camera. It rubs on my neck and irritates it when I use my camera for a longer period of time. So when I came across this Do-It-Yourself project I had to try it!
Here is the end result!
Pretty snazzy looking isn't it???
First, I need to give credit where credit is due. I found this idea on Jillee's Blog, One Good Thing. Click here to check it out.
Here is what I used:
2 bandannas
2 keychain "O" rings
2 clip "D" rings
You'll want to check your camera to see what size rings will attach to it. You can use the O rings only, but I didn't want to have to mess with them when wanting to remove my strap. Those keychain O rings leave me muttering and with broken fingernails.
Here's how I attached my strap.
I wanted to use clip rings so I could take the strap off to wash it if needed. Since the clip rings were were too large to attach directly on my camera, I put O rings on my camera first.
So once you have checked your camera and decided which ring(s) will work for you, you are ready to go.
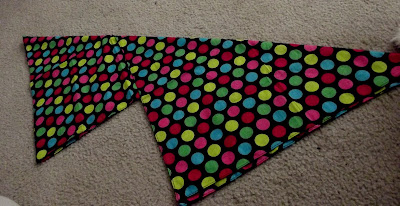
Place the two bandannas on a flat surface, overlapping one another. Fold the one on top in half. (I didn't iron these or even wash them.)
Fold the other bandanna in half on top of it. It should look like this.
Now start folding the bandannas down toward the points. Whatever width you make the fold is the width your camera strap will be. Mine is about 2 inches wide.
Keep folding until you have only the corners peeking out, like this.
Now pin it to hold the folds in place. Pull those corners up and pin as well.
Once it is pinned go ahead and lay it across your neck to make sure the width you have works well for you. Mine ended up a bit wider than I had imagined, but when I tried it on it felt absolutely perfect! If it isn't a width that works for you, simply refold.
Next you are ready to sew. I can't sew, but luckily my daughter, Liz, knows how! Sew across the strap - Liz sewed about every 2 inches. You know the spots where the 2 bandanna tails were sticking out a bit? Liz stitched that area 3 times, spacing the stitching evenly across the "tails" to make them secure.
(Can you tell I don't speak sewing?)
Doesn't Liz do an awesome job?
(My inability to sew is no reflection on my home economics teacher - Mrs. Champine. She was a jewel. But when we started putting pockets on inside out - I was completely and utterly lost. It went downhill from there, but that is a whole other blog!)
Here's a closer look at the sewing.
The horizontal stitching is where Liz has sewn. The black stitching at an angle was already on the bandannas.
When you get to the ends, attach either the O ring or the clip, whichever you have decided to use. If your strap is wider than the ring opening (which will likely be the case) that's fine - mine was too.
Tuck the end of the bandanna under and sew. Again, Liz stitched in 3 areas to make sure it was secure.
Attach to your camera and you have a comfy, cozy camera strap!
I spent $7 on the two bandannas and the clip rings. I just used extra keychain O rings I had on hand. Those would be really inexpensive if you needed to buy them.
I love the feel of this against my neck. I tried it out right away on our trip to Blackberry Farms and it felt so much nicer than the strap that came with my camera! I wasn't readjusting it or constantly lifting my camera to keep the strap from digging in my neck like I had to do before. My new strap was wonderful and made picture taking so much more fun!
And.. it has a lot more pizazz!!


.jpg)
No comments:
Post a Comment
Note: Only a member of this blog may post a comment.