Showing posts with label Recipes. Show all posts

Friday, August 29, 2014

Foodie Friday! - Lemon Blueberry Pound Cake

Not long ago our grocery store had a special on blueberries so we bought several pints.  I had planned to use some to make Michael blueberry scones, one of his favorite blueberry treats.  But shortly after buying them I hurt my thumb and making scones was just a messier process than what I wanted to try to tackle with stitches.  

So I found my mom's recipe for Lemon Pound Cake and thought adding some fresh blueberries to the recipe sounded like a wonderful way to use some of those berries!


Lemon Blueberry Pound Cake

1 lemon cake mix, dry
4 eggs
1 cup water
1/2 cup oil
1, 4-oz pkg instant lemon pudding mix, dry
1/2 to 1 pint blueberries, rinsed and drained

Combine all ingredients, stirring to blend dry ingredients well.  Add blueberries and gently fold to mix them into the batter.  Grease 1 large loaf pain or 4 mini loaf pans.  Bake at 350 degrees for 55 minutes for 1 large loaf and approximately 35 minutes for smaller loaves, until golden brown on top and a toothpick inserted in center comes out clean.  Check frequently as all ovens vary.


Let  cool in pan(s) for 10-15 minutes. Then run a knife around the edge, remove from pan and finish cooling on a wire rack.  You can top with a powdered sugar glaze if you wish, but we enjoyed it just as it was. 

This is a great blend of lemon and blueberries and the pound cake is so moist!  It freezes great!

Happy Friday!

Friday, August 22, 2014

Foodie Friday! - Taco Pie


Taco Pie

1 pound hamburger, browned
1 pkg taco seasoning
Water per seasoning package directions
1 tube of 8 crescent rolls
1 cup crushed Fritos
2 cups shredded cheddar, Mexican, or co-jack cheese

Brown hamburger, drain grease, and add taco seasoning and water according to the directions on the package.  Simmer per directions.  

Place crescent roll wedges in a greased 9" pie plate.  
Press rolls in bottom and up sides to form a crust, pressing seams together.  


Pour half of the crushed Fritos over the crescent roll crust and spread evenly.  


Top with the taco meat - spread evenly


followed by the shredded cheese spread evenly as well. 


 Sprinkle the remaining crushed Fritos on top.  


Bake at 350 degrees for 20 minutes.  Garnish with tomatoes, lettuce, sour cream, etc.


I love that this is a one-dish meal.  Just add your favorite taco toppings and you have a quick, easy, delicious meal!

Happy Friday!

Friday, August 8, 2014

Foodie Friday! - Melissa's Macaroni Salad

I've mentioned before that I'm not a big fan of macaroni-type salads, simply because I want all of the ingredients easily identified.  I like to know what I am getting into, I don't like surprises when it comes to my food.

Father's Day weekend we went to Tyler and Melissa's to celebrate.  When it came time to eat I spotted a macaroni salad.  Just to be safe, I took a very small amount.. and surprise....I LOVED it!  So I asked Melissa to share the recipe. 


Melissa's Macaroni Salad

1, 16-oz package of elbow macaroni
4 medium carrots, shredded
1 large green pepper, chopped
1 medium red onion, chopped
2 cups mayonnaise (I used Miracle Whip)
1, 14-oz can sweetened condensed milk
1 cup sugar
1 cup cider vinegar
1 tsp salt
1/2 tsp pepper

Cook macaroni according to package directions;  drain and rinse in cold water.  In a large bowl, combine the macaroni, carrots, green pepper and onion.


In a small bowl, whisk the mayonnaise, milk, sugar, vinegar, salt and pepper until smooth.  Pour over macaroni mixture and toss to coat.  Cover and refrigerate overnight.  Makes 14 servings.  

I made this in the morning before work and we had it for dinner that night.  The perfect macaroni salad!

Happy Friday!

Friday, August 1, 2014

Foodie Friday! - No Bake Cookie Dough Bars

This week has been busy with work, errands, and getting ready for our annual Scrapping Weekend!  This is a girls only weekend.  My friend of 31 years, Linda, will be coming as always.  In addition, my daughter, Liz, is making the trip from Illinois (she wouldn't miss it) and one of our daughters-in-law,  Laura, is joining us this year for the first time!  She is a teacher so I am anxious to see what projects she will be working on!

Scrapping weekend is pretty laid back and goes something like this:

   - Michael flees the house.  

 - We rearrange the dining room so we can add another table for plenty of work space.  

- We get creative.

 - We talk a lot. 

- We giggle almost as much.

- We eat, probably more than we should.  (It's once a year.)

- We pretty much work on projects all day Saturday.   

We'll end the weekend with church on Sunday and lunch together before everyone heads home.  A few of the hubbies will be joining us on Sunday for church and dinner.    

So it's not like I have to do a lot of work to get ready for the girls' arrival. But seriously, isn't that when most of us get the best housecleaning done - when we are expecting company and the clock is ticking down?

So even though my recipes are always easy, I needed one that was really REALLY easy this week as I was short on time.  

Then I spotted these.  


And I was in love.

Be still my heart.  

My brain said, "Bingo!"

My stomach said, "We are in trouble."  

And my mind was already working on a shopping list. 

I love cookie dough.  And yes, I'm one of those people who eat cookie dough made with raw eggs. I've done it for 50 years, I've survived, and to be honest I'm not going to stop eating a spoon of cookie dough once in a while at this point in my life. But if you prefer the egg-free dough instead,  you will love this one.  Even if you really don't care about the whole egg issue, you will love this one!

I found the recipe on Pinterest and followed the link to here.

No Bake Cookie Dough Bars

1/2 cup unsalted butter, softened
3/4 cup brown sugar
1/ tsp vanilla extract
2 cups all purpose flour
1, 14-oz, can sweetened condensed milk
2 cups chocolate chips

Topping:
1/2 cup creamy peanut butter 
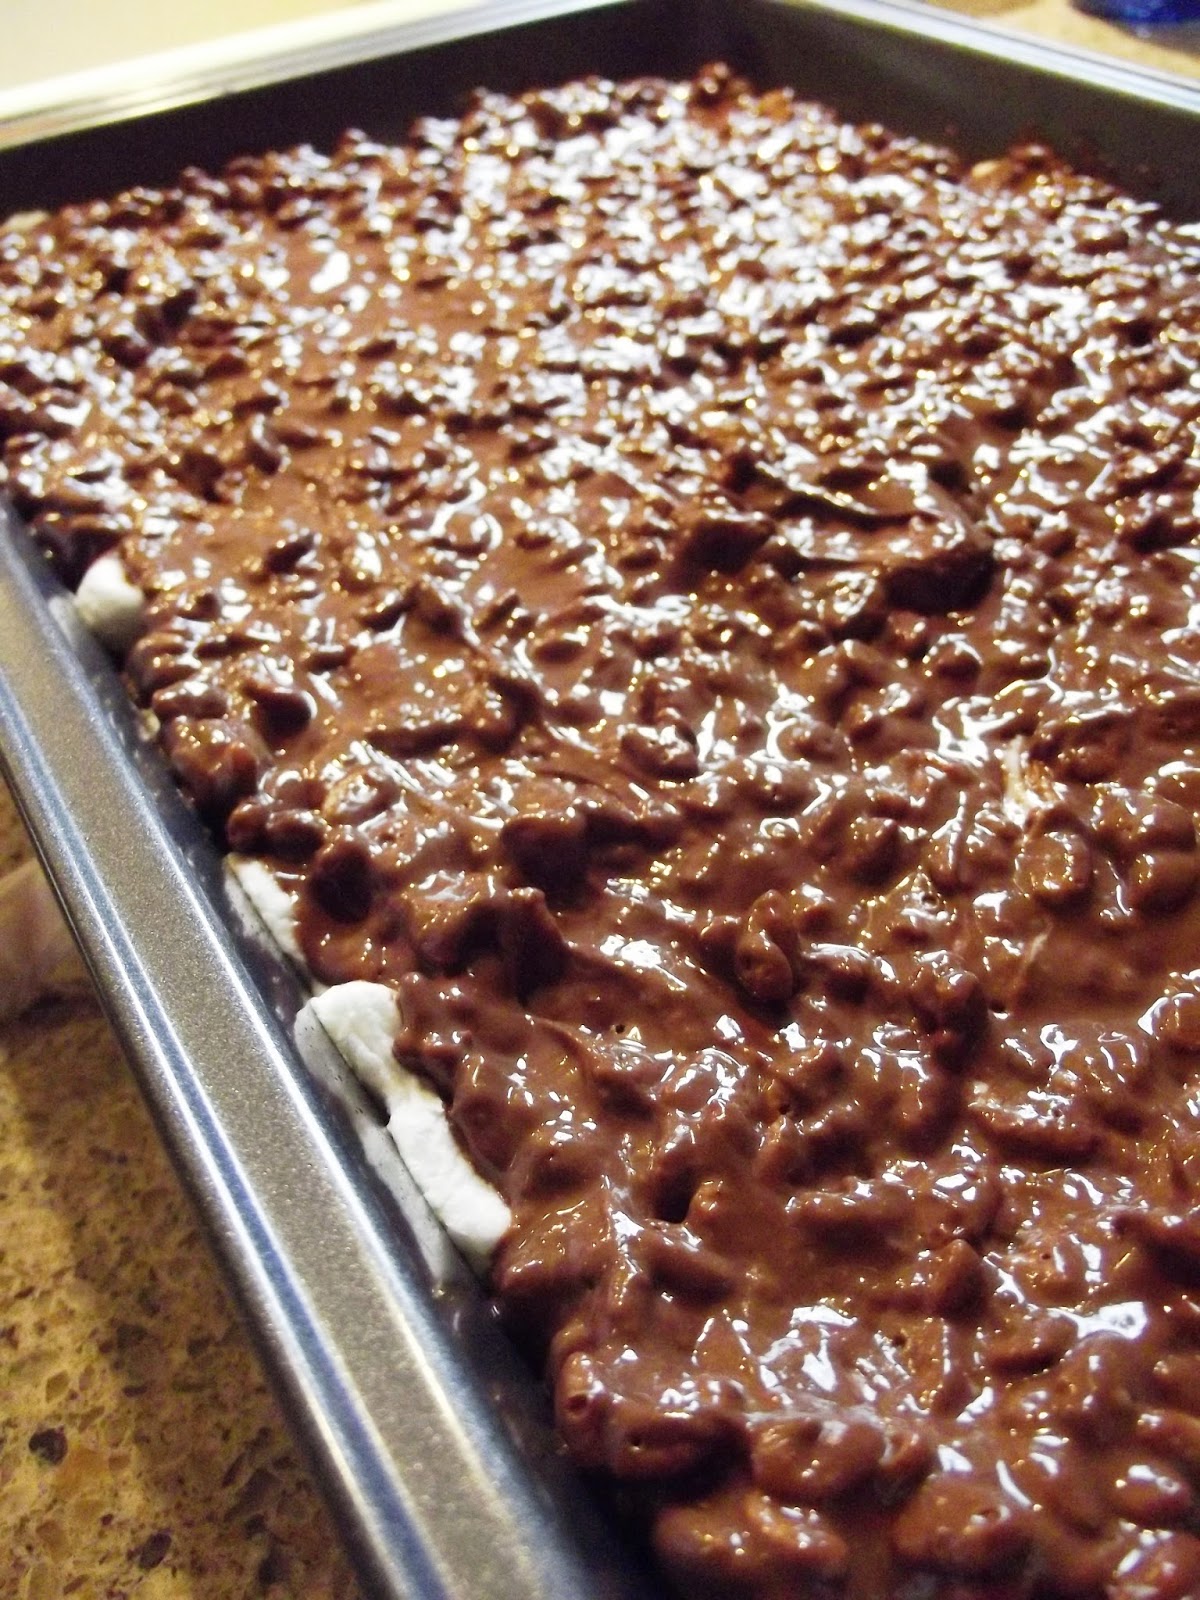
1/2 cup milk chocolate chips

Line an 8 x 8 pan with parchment paper

In large mixing bowl blend butter and brown sugar until fluffy, about 3 minutes.  Add the vanilla and mix well.  With the mixer on low, alternate adding the flour and sweetened condensed milk until both are thoroughly mixed in.  Then add the chocolate chips and mix until evenly dispersed. 


Once all ingredients are well blended put dough in the pan.  The dough will be sticky so pat evenly in pan with a lightly floured hand.  


After dough is pressed in the pan cover with plastic wrap and refrigerate for 3 hours or overnight.  

Once the bars have chilled and are set, combine peanut butter and milk chocolate chips (or semisweet - it's all good!) in a microwave bowl.  I microwaved on high for 1 minute, stirred, and microwaved another 30 seconds or so until the mixture was smooth.    Pour over cookie dough to "frost." Refrigerate another hour.

When ready to cut, simply pick up the parchment paper and lift the bars out of the pan onto a cutting board.  I used a large knife and they cut easily but held their shape well.


This makes about 16 servings.  Cut into small bars as they are really rich!

I doubled the "frosting" because that is what my mother would have done.  I used a mixture of dark chocolate and semisweet chips for the topping. 

Refrigerate in airtight container. 

Happy chocolatechipcookiedoughgoodness Friday.

I made that word up. :)


Friday, July 25, 2014

Foodie Friday! Bacon Wrapped Smokies

I hosted some coworkers for brunch last Saturday.  It is fun to get together and hear what is going on with each other and find out what life after 4:30 p.m. looks like for them.  

Diane MO is getting in some reading and enjoying her flowers.  With boys out of school for the summer Shannon is keeping busy with family activities and keeping her sanity.  And Nancy has a garden!  She even shared some green beans with Michael and I which were wonderful!


For the brunch I made egg bake, coffee cake, fresh fruit and these bacon wrapped smokies.  I first made them for a Christmas brunch with our kids and grandkids several years ago and they were a big hit.  I thought our girls' brunch was a great time to make them again.  


Bacon Wrapped Smokies

16 oz pkg Hillshire Farms Lit'l Smokies
1 pkg bacon (you won't need it all)
1 cup packed brown sugar

Preheat oven to 400 degrees.  Cut bacon slices into strips about 2-1/2 inches long.  Wrap each Lit'l Smokie with a piece of bacon and secure with a toothpick.  Place in a 13 x 9 pan.  Sprinkle with brown sugar. Bake for 30-35 minutes until bacon is crisp and sugar melted.  Cool slightly.

I used a baking sheet and baked them at 350 degrees along with the egg bake and coffee cake.  At that temperature they took about 1 hour 15 minutes.  Since I was baking at a lower temp I could also use a Silpat mat in the pan (Silpat mats are not suggested for higher temperature baking).  This allowed the bacon juice and brown sugar to pool on the mat and blend together and they baked in that "marinade".  (Yum-o!)  

Clean up was easy. I used paper towels to soak up the bacon grease/brown sugar residue, then put the Silpat mat in the sink with just a little soapy water and it was clean in a flash.  

If you try these you are in for a treat!


******

Our friend Loretta shared with me how she cooks her sweet corn, but each summer I have to ask her again as I have forgotten.  I always overcooked it in the past, so thought someone else may appreciate this as well.  Plus, I thought if I put it on my blog I wouldn't have to ask Loretta again next year!

Sweet Corn
Bring water to boil in dutch oven.  Add corn and return to a boil.  The corn is then done.  We had our first peaches & cream sweet corn last weekend.  There is absolutely nothing better than that first ear of homegrown Iowa sweet corn.


Happy Friday!

Friday, July 18, 2014

Foodie Friday! - Confetti Cake Mix Cookies

I had forgotten all about this recipe.  I'm not even sure what reminded me of it.  Years ago a coworker always brought "Cake Mix Cookies" for potlucks.  They are quick to make (you know I'm all about quick recipes) and are delicious.  What makes them really fun is that you can make pretty much any flavor you want. We had both lemon and confetti cake mixes on hand.  In the end, the kid in my won out.  I love confetti cake mix!


If you are looking for an easy recipe to do with the kids this summer, this is the one!  The recipe has 3 ingredients. I used my mixer and within just a couple of minutes the dough was ready to be put on the cookie sheet.  If your little ones don't have the patience and attention span to do a full blown cookie recipe (like me)  this one will be fun, fast and rewarding!

Here's the recipe.


Cake Mix Cookies
1 box cake mix, pick a flavor (I used Hy-Vee Extra Moist Confetti)
2 eggs
1/2 cup oil

Put all ingredients in mixer bowl and blend  until it pulls together and forms a cookie-type dough.  Drop cookies by spoonfuls onto a baking sheet lined with a Silpat mat or parchment paper.  Bake at 350 degrees for 10-12 minutes.  I found 12 minutes was perfect for my oven. I removed them from the oven and let them sit on the cookie sheet for a few minutes before moving them to a cooling rack.  


The cookie possibilities are endless. 

Double chocolate chip (chocolate cake mix and stir in chocolate chips)
Chocolate with white chocolate chips
Chocolate with peanut butter chips
White cake mix with chocolate chips
Yellow cake mix with chocolate chips
Cherry cake...

Add in a few nuts or whatever will work with the mix you use.  

Use your imagination!

I got 27 large cookies out of this batch.  


Happy Friday!

Friday, July 11, 2014

Foodie Friday! - S'mores Bark

The summer weather makes me think of camping and campfires, and that always leads to the thought of s'mores.  I enjoy the relaxation of camping, burning a hot dog over the campfire (nothing like a fire-blackened hot dog!), watching the flames dance and hearing the wood crackle, but my favorite part of it all is the s'mores.  

I don't like being in the heat.  

I don't like mosquitoes.  

But I love s'mores!  

We had the "Salt girls" over for their weekly Bible study and connection group Monday night.  We asked them to come early so we could have dinner together. I had just seen this recipe on Pinterest and followed it to this site:  A Kitchen Addiction.  I thought the girls would love this as much as we would. 
It was a good excuse to try it!


S'mores Bark

24 ounces dark chocolate or milk chocolate
8 ounces white chocolate
3/4 cup graham crackers broken into pieces
1/2 cup marshmallow bits
2, (1.55 ounce) Hershey's milk chocolate bars (or dark chocolate) broken into pieces

Line a 15 x 10 inch cookie sheet with parchment paper.

Melt dark chocolate according to instructions on package, stirring periodically.  Melt white chocolate in a separate bowl following the same instructions. Spread melted dark chocolate onto prepared cookie sheet.  Spoon white chocolate over the top. Swirl white chocolate through dark chocolate using a knife. 


Sprinkle with graham cracker pieces.  


Sprinkle with marshmallow bits, and broken chocolate bars.  Lightly press pieces into melted chocolate.  


Place in refrigerator for at least one hour to cool and set.  Cut into pieces  and store in an airtight container.  


I used milk chocolate as I wasn't sure the girls would like dark chocolate as much as we do. I used a 23-ounce bag of milk chocolate chips.

For the white chocolate I bought two Ghiardelli white chocolate bars from the baking aisle.  

I used mini marshmallows as I was not able to find marshmallow bits.  

Once cut and in Tupperware, I kept it refrigerated due to the summer heat.  
To tell you how good this was, Michael's first words were "Oh my!"


Yep, it's that good.


Happy Friday!

Friday, July 4, 2014

Foodie Friday! - Easy Orange Jello Salad

Last week one of my nieces messaged me and asked me for this recipe.  It was one of my mom's favorite salads to make, so our family knows it well.  I was running errands when I found the message from my niece, so told her I knew it was on my blog and she could find it there if I didn't get home before she needed it.

Once home I looked on my blog so I could send her the link.  I couldn't find it!  Because it was such a favorite recipe of my Mom's, I was sure I had blogged about it at one point, but obviously not.  So I sent my niece the recipe and knew I had to make it for Foodie Friday this week.

I can't tell you the number of times I walked into my childhood home and found my Mom in the process of making this salad.  It brings back wonderful memories for me... and it tastes wonderful!


Easy Orange Jello Salad

3 cups boiling water
1,  4-ounce pkg Jell-O Cook & Serve Tapioca Pudding
1,  4-ounce pkg Jell-O Cook & Serve Vanilla Pudding
1 small box orange Jell-o
16 ounces thawed Cool Whip
1 can mandarin oranges, drained (optional)

In 2-qt saucepan bring the water to a boil.  Add the dry tapioca, vanilla pudding, and jell-o. Bring to a boil and boil for 1 minute.  Remove saucepan from heat and cool.  Fold in mandarin oranges and Cool Whip and refrigerate.   
Enjoy!


Happy 4th of July!

Friday, June 27, 2014

Foodie Friday! - Double Chocolate Crumble Bars

This recipe is an oldie but a goodie!  It's not often I have all the ingredients on hand at once, particularly mini marshmallows and Rice Krispies, but when I do find these items in my pantry these bars come to mind.  

If you haven't tried this recipe in the past it is a definite winner!  


Double Chocolate Crumble Bars

1/2 cup margarine
3/4 cup sugar
2 eggs
1 tsp. vanilla
3/4 cup flour
2 T. cocoa
1/4 tsp. salt
1 T. baking powder

3 cups mini marshmallows

6 ounces chocolate chips
1 cup peanut butter
1-1/2 cup Rice Krispies

Cream butter and sugar.  Add eggs and vanilla.  Combine flour, cocoa, baking powder and salt with other ingredients.  Spread in greased 9 x 13 pan.  Bake at 350 degrees for 15-20 minutes.  

Sprinkle marshmallows on brownie base, using fingers to make a single layer.  Return to oven and bake another 3 minutes - marshmallows will be puffy.  Remove from oven and cool. 


In saucepan combine chocolate and peanut butter.  Stir until melted. Pour over Rice Krispies and stir well to blend.  

Spread chocolate/Rice Krispie mixture on cooled bars.  Chill, cut and refrigerate.


(I don't refrigerate.)


I'm a rebel like that :)


Enjoy!


Happy Friday!

Friday, June 20, 2014

Foodie Friday! - Baked Macaroni & Cheese

I love mac and cheese, especially when it is homemade and extra cheesy.  I haven't made this recipe in decades and was thrilled when my daughter suggested it for Foodie Friday because then I had to make it!

This recipe is from my old, go-to Betty Crocker Cookbook I have had for 34 years.  Here's the scoop on this comfort food favorite.


Baked Macaroni And Cheese

1 to 1-1/2 cups uncooked elbow macaroni, rigatoni, or spinach egg noodles (about 8 oz)
1/4 cup margarine or butter
1/4 cup chopped onion 
1/2 tsp salt
1/4 tsp pepper
1/4 cup flour
1-3/4 cups milk
8 ounces American, Swiss, or Velveeta cheese cut into 1/2-inch cubes

Cook macaroni as directed on the package.  In a second saucepan, cook and stir margarine, onion, salt, and pepper over medium heat until onion is slightly tender.  Blend in flour to make a roux.  Cook over low heat, stirring constantly until mixture is smooth and bubbly; remove from heat.  Stir in milk.  Return to heat and heat to boiling, stirring constantly - mixture will thicken.  Boil and stir 1 minute, remove from heat.  Stir in cheese until melted. 

Place macaroni in ungreased 1-1/2 quart casserole.  Pour cheese sauce over and stir to coat macaroni well.  Cook uncovered in 375 oven for 30 minutes.  

Make 5 servings. 


*******

I use the lesser amount of macaroni suggested (1 cup) as I like my mac and cheese a little thinner with more sauce and less pasta.  

I returned the pan to a low burner after stirring the cheese in.  I used chunks of Velveeta and needed a bit of heat to get the last few pieces melted.  Using shreds of your favorite cheese will speed up the melting process and you likely will not need to return it to the burner.  

I like my pasta well cooked.  If you like your pasta a little more firm cook to  al dente when boiling  and let it finish cooking when you put it in the oven.  I would use 1 cup of pasta if you do this, to allow some of the sauce to be absorbed in the pasta as it bakes.  


Happy Friday!

Friday, June 13, 2014

Foodie Friday! - BBQ Chicken Dip

Today's recipe combines two of my favorite foods:  chicken and BBQ sauce!  I looked through some recipes I have tucked away in my "try this sometime" file and came across this one.  I made this dip last night and it was wonderful!  Of course, with BBQ sauce and chicken how can you go wrong?


BBQ Chicken Dip
8 ounces softened cream cheese
1/2 cup BBQ sauce
1 cooked, cut-up chicken breast or 13 ounces canned chicken
1 cup shredded co-jack cheese
Green onion (optional)
Cilantro (optional)

Heat oven to 350 degrees.  Soften cream cheese. Stir together the cream cheese and BBQ sauce, blending well.  Add the cooked chicken and co-jack cheese stir all together until thoroughly mixed.

Spread in shallow ovenproof dish.  Bake 20-25 minutes until hot and bubbly.  Sprinkle with green onion and cilantro if desired.

Serve with chips or crackers.

******

I used a total of 3/4 to 1 cup of BBQ sauce as I didn't want the dip to be too dry and it turned out perfectly. I would use that amount next time as well.

I found this recipe here

This one is definitely a winner.  As I am working on this post Michael is in the kitchen sampling a bit more and commenting, "This is really good!  It's a keeper!"  


Happy Friday!


Friday, June 6, 2014

Foodie Friday! - Strawberry Cheesecake Salad

I saw this recipe on Facebook.  It's not often a salad recipe has me anxious to try it, I'm just not a salad person. When it comes to salads I want all the ingredients easily identifiable.  If there are things in a salad I can't identify I call them UFOs:  Unknown Food Objects. 

There are just some fruits and veggies I don't care for and it is usually a texture thing - like pineapple.  I love pineapple juice... but not the texture of actual pineapple.  

But this salad sounded awesome and more like a dessert (how could I not love it?!).  It also sounded refreshing  (perfect for these warmer days) and easy to throw together (always a must!), so I eagerly made it the next day! 


This one is definitely a keeper!


Strawberry Cheesecake Salad

Start with: 
1 box No-Bake Cheesecake (brand doesn't matter)

Make the graham cracker crust that comes with the cheesecake mix (per directions on the box) and press the crust into an 8 x 8 baking dish. 


Stir together to blend:
16 ounces vanilla yogurt
The no-bake cheesecake filling packet (as is - dry)


Fold in:
1 small tub Cool Whip


Stir in:
4 ounces of mini-marshmallows
1 container fresh strawberries, sliced


Put mixture in pan on top of crust and spread evenly.  Chill and serve.

That's it!

*******

I used low-fat vanilla yogurt.  

You could use any variety of the Cool Whip that best suits your dietary needs. 

Other fruit can be substituted if desired.


No funky textures.

No UFOs.


Just some strawberry cheesecake goodness. 


Happy Friday!

Friday, May 30, 2014

Foodie Friday! - Dessert In A Dash

I found my kitchen just long enough this week to make this delicious, fruity dessert!  It has only 4 ingredients and can be ready in a jiffy, but the best part of all is that you use any pie filling you want!


Dessert In A Dash

2 cans pie filling
1 tsp lemon juice
1 white cake mix
1 stick margarine, melted


Spray an 8 x 8 baking dish with nonstick cooking spray and pour in 2 cans of your favorite pie filling.  Spread evenly in dish.


Pour the lemon juice over the pie filling, scattering as evenly as possible. 


Melt the margarine and stir in  dry cake mix, blending well. 


 Using your fingers, break up the cake and margarine mixture into pieces and place evenly over the pie filling and lemon juice. 


This fills an 8 x 8 baking dish nicely. 


Bake at 350 degrees for 25 minutes, or until golden brown.  This is wonderful served warm with a scoop of vanilla ice cream.


Happy Friday!

Friday, May 16, 2014

Foodie Friday! - Guinea Grinders

If possible, my time spent in the kitchen this week was even less than the week before.  Add working overtime to the mix and this week I'm doing good to remember where my kitchen is.

So I dug through my recipe books to see what food idea I could share with you  and spotted my recipe for Guinea Grinders!  I thought you would enjoy trying these. 


Guinea Grinders

1 pound hamburger
1 pound Italian sausage
1 green pepper, diced
1 can pizza sauce
1, 12-oz package shredded mozzarella cheese
1 package hoagie buns

Brown hamburger and sausage with green pepper.  When browned, drain off any excess grease. Add pizza sauce, stir well to blend,  and simmer meat and sauce for 15-20 minutes.  Slice hoagie buns part way through and fill with desired amount of grinder meat.  Top with shredded mozzarella cheese.  Wrap each sandwich in foil and bake at 325 degrees for 15 minutes.

If you are like me and like less bread you can completely slice the buns through, making each half whatever thickness you prefer.  I like to dig out some of the excess soft bread from the middle so the meat and sauce sit in the bread rather than on top.  Place the bread on a baking sheet lined with foil, top the bread with meat and then sprinkle with shredded cheese.  Heat as above until cheese is melted and you have a delicious open-faced sandwich.


Happy Friday!

Friday, May 9, 2014

Foodie Friday! - Meatloaf & Potatoes in the Crockpot

My husband is a newsie and sometimes it can drive me crazy because the news can be so depressing.  I told him Wednesday night that I had absolutely nothing for Foodie Friday.

Zip.  Nada.  Zilch.

My kitchen and I haven't spent much time together lately.  

Luckily Michael said he saw a recipe on the news that morning that looked good:  meatloaf and potatoes in the crockpot.  That sounded awesome!  I was ready for a comfort food meal, but also wanted something that would be quick and easy to put together, so I looked up the recipe he saw on the news and decided to give the basic idea a try.

I was up at 6 and putting this in the crockpot before starting work.  It smelled wonderful all day while it cooked.  Rather than using the meatloaf recipe that Michael saw on the news (I didn't have all the ingredients for their recipe)  I decided to just use my own favorite meatloaf recipe (included below).  This is the best this meatloaf recipe has ever tasted.  I'm sure cooking it in the crockpot kept it more moist and that was the difference.


I know the weather is getting nicer and you may not think of using your crockpot,  but give this recipe a try!


Meatloaf & Potatoes in the Crockpot

2-4 potatoes, peel and cut into 1-inch pieces

1-1/2 pounds lean hamburger
1 cup cracker crumbs
1 cup milk
1 egg
Salt 
Pepper

1/4 cup catsup
3 T. brown sugar

Place peeled, diced potatoes in crockpot.  Combine hamburger, cracker crumbs, milk, egg, salt and pepper.  Mix well until all ingredients are blended.  Form into meatloaf shape and place on top of diced potatoes.  


Top with the sauce (catsup and brown sugar).  


Bake on low 8-10 hours.

********

The recipe called for 2 potatoes and lean hamburger.  I had 85% hamburger on hand so I used 2 extra potatoes to help absorb any extra "juice."  I think I would use 4 potatoes next time too, I just like that amount.  

I always use a few extra cracker crumbs as I like a denser meatloaf - perhaps 1-1/4 cups.  

I make double the sauce ... I'm a sauce person.

This was done at 8 hours.  

This was an easy meal to put together and tasted wonderful.  If you've never tried this combination in the crockpot, please do and let me know what you think!

Guess Michael watching the news isn't so bad after all. 

Happy Friday!

*********

P.S.  Through Sunday save 10% on greeting cards/prints when you spend $8 or more.  
Use code "10FORMOM" at checkout.  Free shipping!
Here's my shop


Doggy Dementia (CCD)

It has been a longgg time since I put anything on my blog, but felt this was the appropriate place to post this information. We recently sha...