Showing posts with label DIY. Show all posts

Monday, January 27, 2014

A Fun Savings Plan

Okay, if you are saying, "Barb, the words 'fun' and 'savings' do not belong in the same sentence together,"  I totally get that.   We know we are supposed to save, but it is always easier said than done.  


You've likely seen this before:


The same is true for each of us and our finances.  Unless you are independently wealthy you likely have a financial struggle  - most of us do. 

Here is ours.

We bought our house in 2005.  Because we bought our house later in life it also means paying it off later in life.  I think it is scheduled to be paid off in 2034. 
I know, right?  My brain can't even comprehend that!  That would mean Michael working until age 82 and me working until age 72.  Well let's just say that is not going to happen. 

Our financial goal is to get our smaller debts taken care of so we can instead put the money spent on those each month toward our biggest debt, our home, and get our house paid off much, MUCH earlier than scheduled.  

We love our home, it is perfect for us and where we want to spend the rest of our lives if our health allows, but we need to pay it off earlier in order for that to happen. In short, we need to be better stewards of the resources God has given us.  

We are working hard on being better with our finances.  It is something most of us need to constantly work on.  So whether you have big financial goals or small ones, here's a savings plan to get us started in the new year. 


The 1st week of the year you put away $1, the 2nd week $2, the 3rd week $3, etc., until the last week of the year when you add $52.   By the end of the year you will have $1,378!!  

I started this last year ("started" the key word).... I didn't complete it.  I was going to surprise Michael with it at Christmas, but things came up and, well, you get the idea.  

This year Michael and I are doing this together so it is easier to stick to.  We set aside a special jar just for this purpose.


See the quarters in there for weeks 1 and 2? Michael sets aside his change, so that is what we started with for the first two weeks.  We have since added the remainder of the money for January.

I love that we can visibly see how we are doing.   It will be fun to watch it build up.  Our goal is to use the money to pay for our tickets for the Iowa Wild next season - and we will have money left over (always a plus)!

By setting aside money for our hockey tickets, it frees up other money in our budget that we can put toward a debt.  Pay off debt A, then put the payment you made for debt A towards debt B.  Pay off debt B, put A and B's payment toward debt C, etc. It truly is a snowball affect.

For now our money jar is next to our joy jar so we never forget to add to it.  I also wrote the amounts on the calendar so we always know what amount to put in next.

 What would you like to save up for?  


Vacation? 


Christmas?  


Help with unexpected expenses?
(those can suck the lifeblood out of any well-planned budget)

A weekend away?


Or something more simple like dinner out?


No matter where you are in life or how little wiggle room your budget has, we all can look at ways to try to save a bit.  If you can't follow the plan perfectly,  do whatever you can!

Pop can money... loose change... it all adds up!!  If you even put in $5 a week (skip that stop at Starbucks), you would have $260 by the end of the year.  

  And if you have young kids, it is a great way for kids to take part in the saving process, see the jar fill up over time, then see the reward of using it for what it was saved for. Teaching your children about saving money is so important.

Our money jar is just one step we are taking this year to improve our overall financial picture.  Getting started is always the hardest part.

I had this blog ready to go a couple of weeks ago.  Then in church yesterday the message was on this topic exactly.  Boy, God has awesome timing!  We always write out a check to our church first when we get paid.  

There is a saying I love, "Let your giving determine your living -  rather than letting your living determine your giving."  Simply put, your money came from God, give back to him first.  Don't pay bills, do some shopping, and go out to eat, etc., only to discover you then don't have enough money to offer back to God. 

It would be fun to have you post pictures of your money jar on my blog Facebook page and hear what you did with your money at the end of the year!


Get saving!

Monday, January 20, 2014

My Joy Jar

I saw this idea on Facebook.  The purpose behind what I have named my "Joy Jar" is to write down little things that bring me joy throughout the year,  tuck those notes in my Joy Jar, and watch the jar fill up. Then on New Year's Eve I will open it, read each note, and be reminded of some of the neat things that brought me happiness throughout 2014.

If you are like me, as the year goes on it is easy to forget little things that happened last week let alone last month.  It is so easy to get so focused on what tomorrow will bring, or what is around the corner,  that I often don't take time to celebrate the little moments as they happen and soon those moments are history.  Being intentional about writing them down right away will help keep me in the moment but also remind me of those special moments down the road.

So with the new year here I knew I had to make one right away and on New Year's Day I headed out to get what I needed for my Joy Jar. 


Here's what I bought:


1 glass jar (half price - $2.50)
1 spool of ribbon (half price - $1.99)
1 pkg of 3 Mixed media labels (clearance $1.24)

 I also bought a mini glue gun and glue sticks in case I needed them.


I wasn't sure what I wanted my jar to look like so I started out using the ribbon.  


 I tied some ribbon around the jar and made a bow.  I liked this look - I thought it looked like such a "happy" jar!  But I really wanted to use one of the mixed media pieces I bought and put the word "joy" on the front - obviously there was not room for all of it.

So I started over. 

I cut a length of ribbon long enough to wrap around the jar and hot glued it in place on the back where the ends met and overlapped just a bit.

I then took one of the mixed media labels and with a permanent marker wrote "joy" on it.  I used the hot glue gun to adhere the label to the front of the jar on top of the ribbon.


Mine is pretty simple as I wanted it to blend well in my kitchen.  You could make it as blingy as you want.


I thought it looked perfect in this corner of our kitchen and the ribbon matched  our lamp well.


Not only will I enjoy reading the things that happened throughout the year, but it will also be fun just to see the jar filling up.  It will be a visible reminder of how blessed we are with joyful moments! 

Let the joy begin!

Monday, September 16, 2013

DIY: Easy Cozy Camera Strap!


I love my camera and taking pictures.  It is a learning process and as a result I delete many more pictures than I keep.  Thank goodness for digital cameras!


What I haven't liked is the camera strap that came with my camera.  It rubs on my neck and irritates it when I use my camera for a longer period of time.  So when I came across this Do-It-Yourself project I had to try it!


Here is the end result!


Pretty snazzy looking isn't it???


First, I need to give credit where credit is due.  I found this idea on Jillee's Blog, One Good Thing. Click here to check it out. 


Here is what I used:

2 bandannas

2 keychain "O" rings

2 clip "D" rings 


You'll want to check your camera to see what size rings will attach to it.  You can use the O rings only, but I didn't want to have to mess with them when wanting to remove my strap.  Those keychain O rings leave me muttering and with broken fingernails. 


Here's how I attached my strap. 


I wanted to use clip rings so I could take the strap off to wash it if needed.  Since the clip rings were were too large to attach directly on my camera,  I put O rings on my camera first. 


So once you have checked your camera and decided which ring(s) will work for you, you are ready to go.


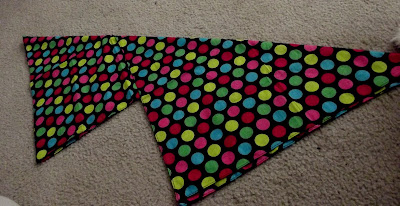
Place the two bandannas on a flat surface, overlapping one another.  Fold the one on top in half.  (I didn't iron these or even wash them.)


Fold the other bandanna in half on top of it.  It should look like this.


Now start folding the bandannas down toward the points.  Whatever width you make the fold is the width your camera strap will be.  Mine is about 2 inches wide. 


Keep folding until you have only the corners peeking out, like this.  


Now pin it to hold the folds in place.  Pull those corners up and pin as well.   


Once it is pinned go ahead and lay it across your neck to make sure the width you have works well for you.  Mine ended up a bit wider than I had imagined,  but when I tried it on it felt absolutely perfect!  If it isn't a width that works for you, simply refold.


Next you are ready to sew. I can't sew, but luckily my daughter, Liz, knows how!  Sew across the strap - Liz sewed about every 2 inches.  You know the spots where the 2 bandanna tails were sticking out a bit?  Liz stitched that area 3 times, spacing the stitching evenly across the "tails" to make them secure.  


(Can you tell I don't speak sewing?)


Doesn't Liz do an awesome job?  


(My inability to sew is no reflection on my home economics teacher -  Mrs. Champine.  She was a jewel.  But when we started putting pockets on inside out - I was completely and utterly lost.  It went downhill from there, but that is a whole other blog!)


Here's a closer look at the sewing.  


The horizontal stitching is where Liz has sewn.  The black stitching at an angle was already on the bandannas.  


When you get to the ends, attach either the O ring or the clip, whichever you have decided to use.  If your strap is wider than the ring opening (which will likely be the case) that's fine - mine was too.  


Tuck the end of the bandanna under and sew.  Again, Liz stitched in 3 areas to make sure it was secure. 


Attach to your camera and you have a comfy, cozy camera strap!


I spent $7 on the two bandannas and the clip rings.  I just  used extra keychain O rings I had on hand. Those would be really inexpensive if you needed to buy them. 


I love the feel of this against my neck.  I tried it out right away on our trip to Blackberry Farms and it felt so much nicer than the strap that came with my camera! I wasn't readjusting it or constantly lifting my camera to keep the strap from digging in my neck like I had to do before.  My new strap was wonderful and made picture taking so much more fun!


And.. it has a lot more pizazz!!


Monday, September 9, 2013

A Fun Project for All Ages

I often joke that I am "the last one to the party" as I am not up on a lot of fads or anything that is new.  Okay, I've probably been out of the loop for the last decade.   I'm a little bit behind the curve on a lot of things. 


Like Pickleball.  


Did you know there is such a thing as Pickleball?  Well there is. I know how to spell it  and I believe it is a cross between badminton and table tennis but my knowledge of the game stops there.


This week I discovered something else:  Smash books.  


I had never heard of them before.  But when I saw one I knew I had to make one.... or more.


I have been wanting to do a scrapbook about my parents but have really struggled with it.  My mom passed away in 2008 and my dad in 2010.   I had so much I wanted to include in it that it was a bit overwhelming to work on.  I tried several times but each try just didn't feel as if I was making it 
"special" enough and I always ended up setting the project aside after a while. 


In addition scrapbooks tell a story, at least mine do. There is a beginning, a middle, and an end.  Part of me didn't want to think of an "end" with my parents.   Coming to the end of a scrapbook about their lives and then closing the book would feel like I was putting a big 'ole "The End" to their legacy.  That just doesn't feel right because their legacy lives on forever. 


And then there's the fact that right now my brain can be pretty random so trying to work on a big, organized, chronological, special scrapbook has just been more than I can manage. 


Enter Smash books!  


They are a combination journal/scrapbook.  The name brand Smash books are made by K & Company and were designed for those who don't feel they are creative enough to do a scrapbook.   They range in price from $13-20. It is a way to preserve thoughts, ideas,  memories, big things, and little things.  In addition to the books, which are pretty much journals with some design accents on the pages,  they have a lot of accessories you can get such as pockets, pens,  and the list goes on and on. 


What I totally love about this concept is that there are absolutely NO rules! What I put in it can be as random and disorganized as I am.  


A smash book is like physical Pinterest!


I had planned to order a K & Company Smash book from Amazon.  In anticipation of ordering it I headed to TJ Maxx.  (Any reason works for me!)  But actually I had seen some fabric tape (washi tape) there on my last visit, looked at it, and even muttered "Who uses fabric tape? Pffft" and put it back.   Now I know.  You use  fabric tape to tape things in "Smash" books because the fabric tape has personality rather than just  plain old tape!  It is pretty AND functional!


I didn't find any fabric tape at TJ Maxx this visit (that's what I get for going "pfffft" on my last visit), but I did find this book I decided to use instead of ordering one. 


It was  $5 - pretty awesome huh?  I am dubbing it the "smoosh" book.  It has a leather-like cover.  


You can use a notebook, a journal, whatever type or size book appeals to you.   Then just start gluing or taping in the things you want to have accessible in one place.  Mine has pictures, quotes, mementos, etc.  


You could include pictures of things you want to do such as home ideas, home remedies,  recipes, the things you find on Pinterest that you want to do... Anything!  You know those things you jot down and then misplace (well at least I do)?  Write them in your smoosh book instead!  I am using scrapbooking and card supplies I have on hand for mine.  It can be as simple or as fancy as you want to make it.  


Again, no rules. 


The object of the book is to fill it to the point that it will not close - smooshing things in there.  K & Company even makes elastic bands to hold it closed once it doesn't close on its own.  


The first night I sat up for 2 hours putting things in it.  I am already seeing how much fun it is going to be.  And those special photos and memories of my parents I can include in here easily, because to me this first book at least is starting off with things close to my heart.  No beginning or end, just ongoing special things in no specific order.  


On this page I just cut some pink and white scrapbook paper for the background and the white pieces with flowers are from a card I received in the past - I just cut the card apart.  The inside of the card is on a different page in the book as it was a special card I received.  


I already have a second smoosh book on hand.  This one has a notebook-type binding so it will be even more forgiving as it gets full.  This one was made by C. R. Gibson, and was a Marshall's find at $4!


I hope you'll join me in doing a smoosh book!  I would love to have you post photos of your book on my Facebook page!


Happy smooshing and Happy Monday!

Wednesday, August 14, 2013

My Project

My favorite thing to do on Pinterest is get home ideas.  I saw a white-framed chalkboard on there that I fell in love with.  I went shopping online for a similar one but the price was $50.  


Ugh!


So I decided to get creative and try to make one myself.   Here's what I started with:


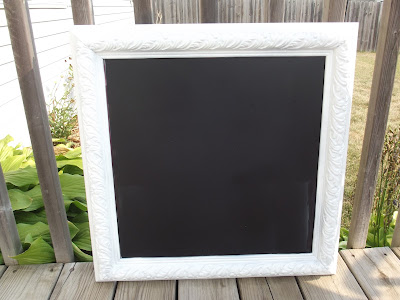
This  measured  22 inches x 22 inches - which I thought would be the perfect size for the area I had in mind, and I loved the frame.  


Here's what else I used:


The back of the picture was covered and had a hanger on it already, so rather than remove the backing I decided to leave the glass in place and tape the frame before spraying the chalkboard paint on.


I needed to rough up the surface of the glass in order for the chalkboard paint to adhere.  I tried a sanding sponge Michael had, but that just wasn't harsh enough, so I switched to a piece of sandpaper and just rubbed it across the glass, scratching it to create a textured surface.  When done I wiped the glass surface with a cloth to clear it of any dust or debris.


Next I painted the chalkboard surface on using black Krylon chalkboard paint.  Krylon suggests several thin coats, sweeping across the surface from side to side.  I did the first coat so it covered the print completely.  It dried within about 15 minutes.  I then came back and did a second coat from top to bottom.


I am not a good taper.  It has to do with the lack of patience thing.  So when I removed the paper from the frame some of the chalkboard paint had gotten on the edge of the frame in a few spots.


I had some white spray paint on hand, so the next morning I covered the chalkboard surface and painted the frame with some white spray paint to touch it up.  


 On the far right bottom you can see a vertical line of white.  Since I probably won't be writing that close to the frame I used some black permanent marker to cover up that line.  I think I could chase myself in circles painting the chalkboard, then the frame, chalkboard, frame, etc. (Next time I would definitely remove the glass before painting it.)


The chalkboard paint needs to sit 24 hours before being used.  Then take a piece of chalk and rub it on the surface on its side, covering the entire surface of the chalkboard to season it. 


Then erase with a felt eraser. It will no longer be stark black.  


The chalkboard is now ready to use!


I read up on chalkboard paint pens as they look fun to use, but from what I read the pen is harder to erase and requires water and a cloth - not always with good results - and rubbing too hard can cause some of the chalkboard paint to come off.  The pens seem more appropriate for outdoor use and if you aren't going to  change the writing often.  


Since I will be putting a Bible verse or quote on ours each week I wanted something that would erase easily.  I originally tried some regular Crayola chalk, but it just  didn't write on the board very well.  After doing some research I discovered there are two types of chalk:  extruded (anti-dust) and molded chalk.  On a chalkboard paint surface you want extruded chalk.  So I went to Staples and picked up the Prang chalk in the picture and it worked AWESOME!! 


I am happy with the result.


And I loved the cost too.


Framed print - $5.00 - Hobby Lobby (clearance item)
Krylon Black Chalkboard Paint - $5.59  - Hobby Lobby (sale item)
White Spray Paint - $2.99 (on hand)
Sand Paper  - approx $2.99 pkg (on hand)
Prang White Chalk - 0.99 - Staples
Prang Colored Chalk 0.99 - Staples
Felt Eraser - $2.29 - Staples


Total Cost:  $20.84
(even adding in the things I already had on hand!)


I actually spent less than $15 out of pocket.


And except for the print, I have more of all the materials to use again.  


I'm thinking of doing another one to hang in the kitchen to write a shopping list on, just using any old frame I can find around the house.   For young families this would be a fun project for a glass coffee table.  


There's something about using chalk on a chalkboard that is just plain fun.  And it will be fun to have a new Bible verse, thought, or note on display each week.


Chalk on!

Doggy Dementia (CCD)

It has been a longgg time since I put anything on my blog, but felt this was the appropriate place to post this information. We recently sha...